Loading your bikes onto your SUV rack marks the start of an adventure. But as you cinch down those straps or tighten those clamps, a nagging question often arises: how tight is too tight? You want your precious bikes held securely, immune to the bumps and vibrations of the road. Yet, the fear of crushing a delicate carbon frame, denting lightweight aluminum, or damaging a component by overzealous tightening is a very real concern for conscientious cyclists.
Finding that perfect balance – snug enough for unwavering security, yet gentle enough to prevent harm – is an art and a science. This guide will delve into the principles of properly securing straps and clamps on various types of SUV bike racks, ensuring your bikes arrive at their destination safe, sound, and undamaged.
Why Proper Tension Matters: The Dual Risks
The tension you apply to your bike rack’s securing mechanisms is critical, and getting it wrong can lead to two distinct, equally undesirable outcomes:
- The Risk of “Too Loose”:
- Excessive Sway & Contact: If straps or clamps are too loose, bikes can sway, rock, or bounce excessively. This can lead to bike-to-bike collisions (damaging frames, derailleurs, and handlebars) or even contact with your SUV, resulting in scratches, dents, or worse.
- Catastrophic Failure: In extreme cases, a poorly secured bike could detach from the rack entirely – a dangerous and costly scenario for you and other road users.
- Rack Stress: Constant, uncontrolled movement of bikes also puts undue stress on the bike rack components themselves, potentially leading to premature wear or failure.
- The Risk of “Too Tight” (Our Primary Focus):
- Frame Damage: This is the most significant concern, especially for high-performance bikes.
- Carbon Fiber: Highly susceptible to crushing or cracking under concentrated clamping pressure.
- Lightweight Aluminum: Thin-walled aluminum tubes can be dented, creased, or even ovalized.
- Component Damage: Over-tightening can harm various parts:
- Handlebars/Seatposts: Clamps in these areas can cause damage if excessively torqued.
- Rims: Wheel straps or clamps, if over-tightened on platform racks, can potentially damage rims, especially lightweight carbon fiber rims.
- Tires: Extreme pressure from tire-hold clamps could, in rare cases, damage tire sidewalls or unseat a tubeless tire.
- Rack Component Damage: Applying excessive force can also damage the rack itself – stripping threads on bolts, breaking plastic buckles or ratcheting mechanisms, or bending support arms.
- Frame Damage: This is the most significant concern, especially for high-performance bikes.
Understanding Different Rack Mechanisms and Their Pressure Points
Different SUV bike racks employ various methods to secure bikes, each with its own pressure points and considerations:
Trunk Mount & Hanging Hitch Mount Racks: These typically feature cradles where the bike’s top tube (and sometimes seat tube) rests, secured by rubber or nylon straps with cam buckles or ratchets.
- Pressure Points: Directly on the frame tubes.
- Risk: High potential for frame crushing if straps are over-cinched, especially on non-round or delicate carbon tubes. Anti-sway cradles, while beneficial for stability, also apply pressure.
 No Hitch? No Problem! The Best SUV Bike Racks Without a Hitch for 2 (or More!) Bikes
Platform Hitch Mount Racks: These are often preferred for better stability and bike protection.
- Frame Clamps: Some platform racks use an upright arm with a clamp that grasps the bike’s top tube or down tube. While often padded, the risk of over-tightening and damaging sensitive frames (especially carbon) is significant.
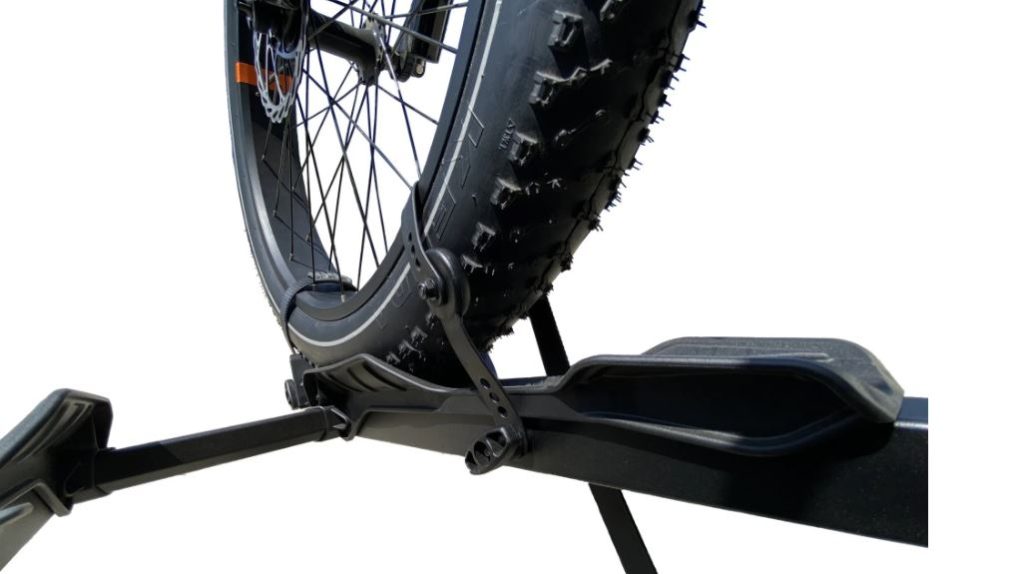
- Wheel/Tire Hooks or Arms: Many modern platform racks, ideal as a bike carrier for full suspension MTBs or bikes with unconventional frames, use hooks or arms that arch over and secure the front and/or rear wheel/tire. This “no frame contact” design is excellent for protecting the frame. The main pressure is on the tire, and to a lesser extent, the rim. These are common on fat tire bike racks and robust ebike carriers.
- Wheel Straps: Ratcheting straps are used to secure the wheels into trays or channels. Pressure is applied to the rim and tire.
Best Platform Hitch Racks for SUVs
Roof Racks:
- Fork Mounts: The bike’s front fork is clamped directly into the rack. Requires precise tightening according to manufacturer specifications to avoid damaging fork dropouts.
- Frame Clamps (Upright): Similar to platform frame clamps, an arm secures the downtube. Carries the same risks for frame damage if over-tightened.
- Wheel-On Upright Racks: An arm typically secures the front wheel, similar to some platform hitch racks, avoiding frame contact.
Secure Your Bikes Up Top: The Essential SUV Roof Rack Guide (2025)
Even a versatile swing-away bike rack will use one of these core bike-securing mechanisms (hanging cradles or a platform system), so the same principles of tension apply.
General Principles for “Just Right” Tension
Achieving the correct tension is less about brute force and more about finesse and observation:
- The “Snug and Secure” Test: Once secured, grab the bike firmly (e.g., by the saddle or handlebars) and try to gently rock it side-to-side and push/pull it fore-and-aft. There should be very minimal play or wobble. The bike should feel like it’s an integrated, stable part of the rack and vehicle, not an independent entity moving around.
- No Visible Deformation – The Golden Rule: This is paramount. As you tighten any strap or clamp, watch the point of contact closely. If you see the bike frame tube visibly indenting or changing shape, a carbon rim compressing, or a tire excessively deforming against the rim, it is too tight. Back off immediately.
- Heed Manufacturer Instructions: This cannot be overstated. Reputable rack manufacturers like Thule, Yakima, Kuat, and Saris provide specific instructions and sometimes even recommended torque values or indicators for their securing mechanisms. For instance, Thule’s AcuTight knobs click when optimal torque is reached. Always read and follow these guidelines. You can usually find these on their official websites.
- Tighten Incrementally: Don’t yank straps to their maximum or crank down clamps with full force in one go. Apply tension gradually, checking the bike’s stability and looking for any signs of deformation at each step.
- Even Pressure Distribution: If multiple straps or contact points are used to secure a single bike (e.g., two cradle straps on a hanging rack), try to ensure the tension is distributed as evenly as possible between them.
Specific Considerations for Different Materials and Bike Types
The “just right” tension can vary based on what you’re transporting:
- Carbon Fiber Frames: Exercise extreme caution. These frames are incredibly strong in their intended directions of force but are vulnerable to crushing from clamping.
- Ideal: Use a “no frame contact” rack (wheel/tire hold).
- If Frame Contact is Unavoidable: (e.g., a high-quality trunk mount used with extreme care for short, essential trips). Use substantial, clean padding (like foam pipe insulation) directly on the frame at all contact points. Apply only enough strap pressure to prevent movement, constantly checking for any frame compression. Refer to your bike manufacturer’s guidelines on transport; for example, Trek’s Carbon Care page explicitly warns against clamping carbon frames.
- Aluminum Frames: While generally more robust than carbon against clamping, thin-walled or hydroformed aluminum tubes can still be dented or deformed if excessive force is applied.
- Full Suspension MTBs: Avoid any clamps or straps directly on suspension components like shock bodies, fork stanchions, or dropper post stanchions, as this can cause serious damage. A bike carrier for full suspension is typically a platform style with wheel/tire holds.
- E-bikes: These heavier bikes require a very secure hold. Ensure your rack is rated as an ebike carrier and can handle the weight. While the frames are robust, avoid over-compressing areas housing batteries or wiring.
- Fat Tire Bikes: Racks designed as fat tire bike racks will have wider wheel trays and often longer straps or larger clamps for the tires. Ensure these secure the bulky tire without putting undue stress on the rim, especially if running lower tire pressures.
Tips for Different Strap and Clamp Types
- Nylon Straps with Cam Buckles: Pull the strap snug until the bike is stable and doesn’t rock in its cradle. The cam buckle should engage and hold the tension without needing to use your full body weight to pull the strap.
- Ratcheting Straps (for bikes or wheels): Listen to the clicks. Typically, a few clicks are enough to secure the bike or wheel once the slack is taken up. If the bike/wheel is stable and you see any deformation, you’ve gone too far. It’s easy to over-tighten these with that tempting “one more click.”
- Frame Clamp Arms (on some platform/upright roof racks): If it’s a screw-type clamp, tighten until the clamp makes firm, secure contact and the bike doesn’t move. If the clamp has a quick-release lever, adjust the tension nut so the lever closes with firm pressure but doesn’t require excessive force that could damage the frame. If your rack has a torque-limiting feature, trust it.
- Wheel Hooks/Arms (Platform Racks): Ensure the hook is correctly positioned over the wheel, close to the fork or seat stays as per instructions. Apply enough downward pressure so the bike is firmly seated and the wheel cannot bounce out. The tire will compress slightly; this is normal. Excessive compression, however, is not.
The Final “Shake Test” and Regular Re-Checks
Once all bikes are loaded and secured according to the rack manufacturer’s instructions and the principles above:
- Perform a Shake Test: Grasp each bike firmly by a structural part (like the frame near the rack contact point, or the saddle) and try to gently but firmly move it side-to-side and front-to-back. There should be very little independent movement or play. The bikes should feel like a solid unit with the rack.
- Re-Check After Driving: After driving for a few miles (especially on bumpy roads), pull over in a safe location and re-check the tension of all straps and clamps. Vibrations can sometimes cause slight settling or loosening. Periodically re-check during longer trips.
Conclusion: Security Through Attentiveness, Not Brute Force
Properly securing straps and clamps on your SUV bike rack is a balancing act. The goal is unwavering stability and security for your bikes, achieved through attentive, incremental tightening and careful observation, not by applying brute force. Prioritize the “snug and secure” feel, watch for any signs of deformation on your bike’s frame or components, and always default to your rack and bike manufacturers’ guidelines. By understanding how your rack works and respecting the limits of your equipment, you can ensure that “too tight” never becomes a damaging reality for your cherished bikes.